How to read a crochet symbol chart
A symbol chart shows stitch relationships at a glance. Start with its own key and direction markers, then compare it with the written instructions.
Common symbols to recognise
| Symbol | Stitch (US) | Stitch (UK) |
|---|---|---|
| Small oval | Chain (ch) | Chain |
| Cross or X | Single crochet (sc) | Double crochet |
| Plain T | Half double crochet (hdc) | Half treble |
| T with one diagonal slash | Double crochet (dc) | Treble |
| T with two diagonal slashes | Treble (tr) | Double treble |
| Filled dot | Slip stitch (sl st) | Slip stitch |
For the standard tall-stitch symbols listed here, the diagonal slashes distinguish stitch height. Do not use that shortcut to guess a custom cluster, puff or other unfamiliar symbol. Look it up in the key.
References: Craft Yarn Council chart symbols and US–UK terminology.
Reading a round
Many motifs begin at the centre and continue outward. Locate the start marker, round numbers, arrows and any join. A ring may represent a magic ring or a joined chain; the written start instructions tell you which.
Follow the chart’s direction markers. Right-handed circular charts often run anticlockwise, but turned rounds, left-handed instructions and special constructions need their own directions.
Look at the base and the top
- A symbol’s base indicates where that stitch is placed, interpreted using the chart key.
- Several stitches sharing one base may form an increase or a group in one stitch or space.
- Stitches joined at the top may indicate a decrease or a cluster; their bases and the key distinguish them.
- Stitches placed into a chain arch may be worked into the space. Check whether the pattern instead specifies an individual chain.
Reading rows
Find the foundation, row numbers and starting edge. Charts for turned rows commonly alternate direction, but do not assume that every odd-numbered row starts at the same side. Arrows, row labels and the written instructions take priority.
A small chart with its written instructions
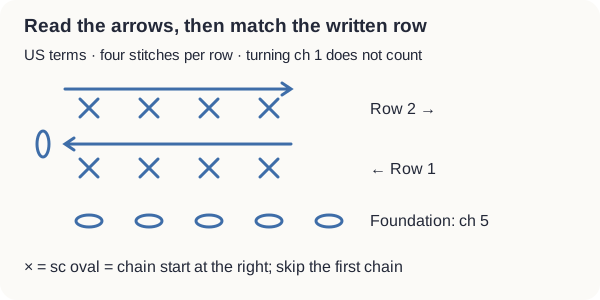
US terms: Ch 5. Row 1: sc in the second chain from the hook and each remaining chain (4 sc). Ch 1, turn. Row 2: sc in each stitch (4 sc). The turning chain does not count as a stitch.
The bottom five ovals are foundation chains; the rightmost chain is skipped for height. The next row starts on the opposite edge. A left-handed working order and a mirrored image are different choices: changing the hand should not silently flip a letter or motif in a color chart.
Open Chart Studio directly · Download the teaching chartImage to crochet chart: an original two-color example
A colorwork chart assigns each image cell to a yarn color. In this example, one cell becomes one SC stitch in a turned row. It shows color placement; gauge and color-change technique still need a swatch.

The top four displayed rows are BBBBWWWWBBBB; the bottom four are BBBBWWWWWWWW. There are 48 black and 48 white cells, 96 in total. The chart keeps that image orientation; reading direction determines the order below.
| Row | Direction | Color runs |
|---|---|---|
| 1 | Right to left | 8 W, 4 B |
| 2 | Left to right | 4 B, 8 W |
| 3 | Right to left | 8 W, 4 B |
| 4 | Left to right | 4 B, 8 W |
| 5 | Right to left | 4 B, 4 W, 4 B |
| 6 | Left to right | 4 B, 4 W, 4 B |
| 7 | Right to left | 4 B, 4 W, 4 B |
| 8 | Left to right | 4 B, 4 W, 4 B |
US SC starting row: ch 13. Starting in the second chain from the hook, work 8 sc in white and 4 sc in black (12 sc). Ch 1 and turn; the turning chain does not count. Follow the next row’s listed colors. Keep yarn tension and the chosen color-change method consistent when swatching.
Open this two-color exampleOpen a prepared, editable chart matching this image. Two colors stay locked; existing projects are kept.Download the original source SVG · Use your own image
For your own work, choose an image you own or have permission to use. Review the preview before creating a chart; small details may disappear at a low cell count.
Measured SC gauge changes the estimated size without changing cells. Resize is a separate preview-and-apply operation. Confirm the starting corner, row arrows and letter key against the exported color sequence. Left-handed SC and filet reading are available; left-handed C2C instructions are not supplied. A granny pixel export is a color plan, not a complete construction.
Keep the editable backup as well as the written output. A clean chart still needs a swatch for color changes, tension and physical proportions.
Use a chart to ask better questions
A chart can make placements and repeats easier to compare. Check whether each stitch has an intended destination and whether the selected size or repeated section matches the written instructions.
Spacing on the page is a drawing choice. Crowded symbols are not proof that the fabric will ruffle, and a tidy drawing is not proof of a workable pattern. Review the counts and make a sample.
Where charts stop
A chart records stitch relationships, not the measured gauge, drape or fit of your finished piece. If its instructions disagree with the text, first check the version, size, legend and repeat boundaries; ask for clarification if the disagreement remains.
Check the instructions you havePattern Doctor checks supported stitch counts and placements. Read any partial-check notices and review unparsed instructions yourself. No account is needed.Open crochet test notes to record your yarn, hook, measurements and what happened. Your worksheet stays on your device; exporting it does not submit it to Crochive.
Read next
- Why your crochet circle rufflesWhat round totals can and cannot tell you.
- Crochet pattern mistakes worth checkingCounts, placements and unclear instructions.